People assume pears and apples are interchangeable when it comes to pruning. The timing is similar, but the trees behave quite differently.
Both are pruned during winter dormancy, both respond to the same basic principles of removing dead wood and opening up the canopy. But pears grow more upright, produce more fruiting spurs, and tolerate harder pruning than apples. If you prune a pear tree exactly as you would an apple, you’ll end up with a narrow, congested tree that produces small fruit.
Understanding these differences means you can work with the tree’s natural habit rather than fighting it.
Quick Answer
Prune pear trees during winter dormancy. In USDA zones 5-7, the ideal window is December to February. In warmer zones (8-9), prune January to March. In colder zones (4 and below), wait until late winter. The timing is the same as for apples, but pears need different handling—they grow more upright, produce more spurs, and require more effort to train branches outward.
The same timing, different trees
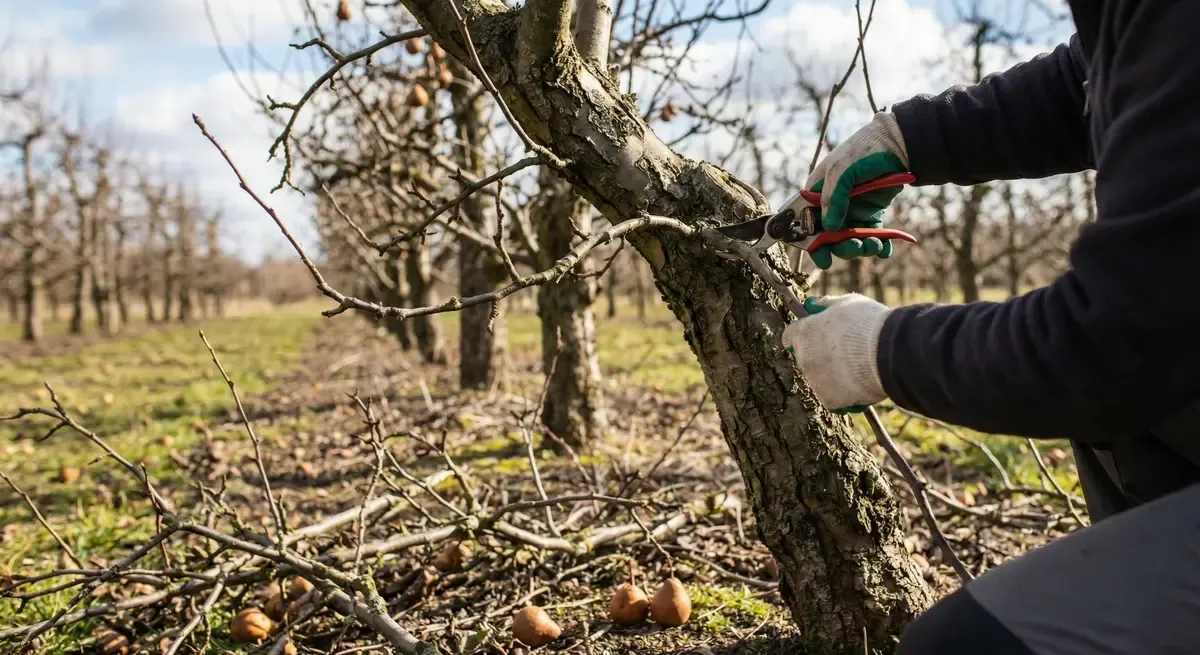
Pear trees are pruned during winter dormancy, just like apple trees. Once the leaves have fallen and the tree has shut down for winter, you can prune without stimulating excessive regrowth or losing sap.
The dormant window runs from late autumn through to early spring. Pears break dormancy slightly later than apples, so you have a bit more leeway at the tail end of the season. In colder regions, you can safely prune into March without triggering premature growth.
In USDA zones 5-7, the ideal time is December to February. In warmer zones (8-9), prune from January to March. In colder zones (4 and below), wait until late winter to avoid cold damage to fresh cuts. The tree is fully dormant, the structure is visible, and you’re not working in the heat of summer or the rush of spring.
But while the timing is the same, the trees are not. Pears are more vigorous, more upright, and more prone to producing dense clusters of fruiting spurs. They need a different approach.
Key differences from apple pruning
Pears and apples are both pome fruits, both respond to similar pruning cuts, and both fruit on spurs. But the way they grow is different.
Pears grow more upright. Apple trees naturally spread outward, forming a rounded canopy. Pears grow vertically, with branches that angle steeply upward. If you don’t actively train them outward, you end up with a narrow, congested tree that’s difficult to manage and prone to shading itself out.
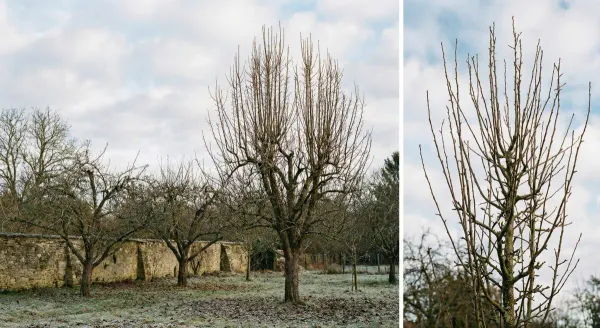
I’ve got a Conference pear that demonstrates this perfectly. Every year, it throws up vigorous vertical shoots that would create a dense, unproductive canopy if I didn’t train them outward. It’s a constant battle against the tree’s natural habit.
Pears are predominantly spur-bearing. Most apple varieties produce fruit on spurs, but some are tip-bearing or partial tip-bearing. Pears are almost exclusively spur-bearing. Whether you’re growing Bartlett, Anjou, Bosc, or Conference, they all produce dense clusters of spurs along the branches, and these need thinning to maintain fruit quality.
Pears tolerate harder pruning. If you need to renovate an old, neglected pear tree, you can cut back harder than you would with an apple. Pears respond well to renovation pruning, producing strong new growth from old wood. Apples are more sensitive and can sulk if you cut too hard.
These differences mean you need to adjust your approach. The timing is the same, but the technique is not.
Tools You'll Need
Sharp bypass secateurs for branches up to 2cm, a pruning saw for thicker branches — pears produce dense wood that blunts tools faster than apple. Loppers help you reach into congested canopies without climbing. Keep a sterilising solution handy for cleaning between trees, especially important if fire blight is in your area.
The upright growth challenge
The most obvious difference between pears and apples is the growth habit. Pears grow upright. Left to their own devices, they form a narrow, vertical canopy with branches that angle steeply upward.
This is a problem for several reasons. Upright branches are vigorous but produce less fruit. Horizontal branches are more fruitful. Upright growth also creates a congested canopy, with branches crossing and shading each other out.
When you prune a pear tree, you need to actively train it outward. Prune to outward-facing buds. When you make a cut, the bud just below the cut will grow out in the direction it’s pointing. Choose buds that point outward, away from the centre of the tree.
Use spreaders or ties to train branches to a wider angle. Young branches are flexible and can be tied down to a more horizontal position. This encourages fruiting and opens up the canopy. Spreaders are short pieces of wood or plastic that push branches outward, holding them at a wider angle.
This is more work than pruning an apple tree, where the natural habit is already spreading. But it’s essential if you want a productive, manageable pear tree.
Spur management
Pears produce fruiting spurs prolifically. Spurs are short, stubby growths that produce flower buds and fruit. They form along the branches and can persist for many years, becoming more complex and branched over time.
This is good news for fruit production, but it can become a problem. Over time, pears develop dense clusters of spurs, crowded together along the branches. These clusters produce lots of small fruit, rather than fewer, larger fruit.

Spur thinning is more important for pears than for apples. Every few years, go through the tree and thin out the oldest, most congested spurs. Remove entire spur clusters where they’re too dense, or cut back complex spurs to a simpler structure.
This improves fruit size and quality. It also improves air circulation, reducing the risk of fungal diseases like scab.
Spur thinning is done during winter pruning, at the same time as the main structural work. It’s fiddly, but it makes a noticeable difference to the fruit. I thin the spurs on my Conference pear every two to three years, and the difference in fruit size is immediately obvious the following season.
Summer pruning for trained forms
Winter pruning is for freestanding pear trees. But if you’re growing pears as espaliers, cordons, or fans, you’ll also need to summer prune.
Summer pruning is done in July and August, when the tree is in full growth. The aim is to restrict growth and encourage the formation of fruit buds. You cut back the current season’s growth to a few leaves, which diverts energy into fruit production rather than vegetative growth.
This is the same technique used for trained apple trees. The timing is the same, the cuts are the same, and the results are the same.
But summer pruning is only for trained forms. If you summer prune a freestanding pear tree, you’ll stimulate regrowth and end up with a mess of water shoots. Stick to winter pruning for freestanding trees.
Fire blight considerations
Fire blight is a bacterial disease caused by Erwinia amylovora. It affects pears, apples, and other members of the rose family. The bacteria enter through flowers, wounds, or pruning cuts, and spread through the tree, causing shoots to blacken and die back.
Fire blight is a significant concern in the US, particularly in the Pacific Northwest, California, and the eastern states. It’s less common in the UK, though risk is increasing as summers become warmer and wetter. If fire blight is present in your area, you need to adjust your pruning approach.
Prune in dry weather. Fire blight spreads in wet conditions, so avoid pruning during or immediately after rain.
Sterilise your tools between cuts. Dip secateurs or saw blades in a solution of bleach or methylated spirits to kill bacteria. This is especially important if you’re cutting out infected wood.
Cut at least 30cm (12 inches) below visible infection. Fire blight spreads through the vascular tissue, so you need to cut well below the blackened, dead wood to remove all traces of infection.
Burn or dispose of infected wood. Do not compost it, as the bacteria can survive and spread.
If fire blight is not present in your area, you don’t need to take these precautions. But it’s worth being aware of the disease, particularly if you’re growing susceptible varieties like Bartlett.
Regional timing
Timing varies by USDA zone and local climate. The key is to prune when the tree is fully dormant but before buds start to swell in spring.
In USDA zones 5-7 (most of the northern and central US), prune from December to February. This covers the core dormant period when the tree is fully shut down.
In warmer zones (8-9, including parts of the South and Pacific Coast), prune from January to March. Winters are milder, and pears may not enter full dormancy until later.
In colder zones (4 and below, including parts of the upper Midwest and mountain regions), wait until late winter—late February to early March. Pruning too early risks cold damage to fresh cuts.
In the UK, the timing is similar: prune from November to early March, adjusting for your region’s frost patterns.
If you prune too early in cold zones, you risk frost damage to fresh cuts. If you prune too late, you lose sap and stimulate excessive regrowth. Watch the buds — when they start to swell, your window is closing.
Month-by-month pruning calendar
| Month | What to Do |
|---|---|
| November | Leaf fall. Pears hold leaves longer than apples — wait for full drop. |
| December | Pruning window opens. Good time for structural work and spur thinning. |
| January | Main pruning month for most temperate climates. |
| February | Continue pruning. Check branch ties and spreaders from last year. |
| March | Final window in colder zones. Stop when buds swell. |
| April-June | No pruning. Monitor for fire blight in affected areas. |
| July-August | Summer pruning for trained forms only (espaliers, cordons, fans). |
| September-October | No pruning. Disease risk is high. |
Common mistakes
The most common mistake is treating pears exactly like apples. The timing is the same, but the approach is different. Pears need more effort to train outward, more attention to spur management, and a different mindset when it comes to renovation pruning.
Ignoring upright growth is another mistake. If you don’t actively train branches outward, you’ll end up with a narrow, congested tree. Prune to outward-facing buds, use spreaders, and tie down young branches to a more horizontal position.
Not thinning spurs is a mistake that builds up over time. Pears produce spurs prolifically, and these need thinning every few years to maintain fruit quality. If you ignore spur management, you’ll end up with lots of small fruit and a congested canopy.
Pruning too lightly is also a mistake. Pears tolerate harder pruning than apples, and they respond well to renovation work. If you’re dealing with an old, neglected tree, don’t be afraid to cut back hard. Pears will regrow vigorously from old wood.
After you prune
Don’t apply wound paint — pears callus over wounds effectively on their own. The old advice was to seal large cuts, but research shows that wound paint can actually trap moisture and encourage rot rather than prevent it. Let the tree heal naturally.
Check tied-down branches after a few weeks to make sure ties aren’t cutting into bark as the tree grows. Pears put on growth quickly in spring, and a tie that was loose in February can be biting into the bark by April. Loosen or reposition ties as needed.
Monitor for fire blight symptoms in spring if you’re in an affected area. Look for blackened shoot tips with a characteristic shepherd’s crook shape. If you spot infection, cut it out immediately, sterilising your tools between cuts.
Expect vigorous upright regrowth from heavy cuts. Pears respond to hard pruning by throwing up water shoots — fast-growing vertical stems that emerge from pruning wounds or along the upper side of branches. Plan to address these in summer by rubbing them off when they’re small and soft, or selecting the best-placed ones to train outward for future fruiting wood.
What to record
Pruning is a long-term process. Pear trees respond slowly, and it can take several years to see the full effect of your pruning decisions. Keeping records helps you track what works and what doesn’t.
Record the date you pruned, what you removed, and any training work you did. Note which branches you cut back, which spurs you thinned, and which branches you tied down or spread outward.
Record the tree’s response. Did it produce more fruit the following year? Did it grow more vigorously? Did the shape improve?
Over time, these records build up into a detailed history of the tree. You can see patterns, learn from mistakes, and refine your approach.
Leaftide’s permanent plant profiles are designed for this. Each tree gets its own profile, with space to record pruning dates, notes, and observations. You can track year-over-year growth and compare different trees to see what works best.
For more on what to record and why it matters, see our guide to keeping a fruit tree pruning log.
Never forget when you pruned
Free for up to 30 plants. No card needed.
Sources
This article draws on guidance from university extension services and horticultural organisations:
- Penn State Extension: Pruning Fruit Trees
- Oregon State University Extension: Training and Pruning Your Home Orchard
- RHS: Winter pruning of apples and pears
- RHS: Summer pruning of apples and pears
These guides provide detailed information on timing, technique, and common problems for both US and UK growers.
For timing guidance on other fruit trees, see our articles on when to prune apple trees, when to prune cherry trees, when to prune peach trees, and when to prune plum trees.